The Simulated Live Webinar (SimuLive) feature was introduced with Adobe Connect 12.10 (2025) and is only available with Adobe Connect Seminar Rooms and needs licenses such as Shared Seminar Room or a Shared Events pack.
SimuLive webinars are ideal for recurring sessions when the host may not be available or wants to focus on interacting with participants for better engagement. And they reduce the risk of technical issues.
What is a Simulated Live Webinar?
Simulated Live webinars let you deliver polished, prerecorded content to a live audience at a scheduled time — replicating the feel of a real-time session. While the content is prerecorded, your team can still engage the audience through live chat, polls, and Q&A.
This format is perfect for scaling your webinar strategy without needing presenters to be live.
How to create a simulated live room (SimuLive room)?
- Create a seminar room by clicking on the + Create button > Seminar of Adobe Connect Central Home page, or from the New Seminar Room button available on the Seminars tab.
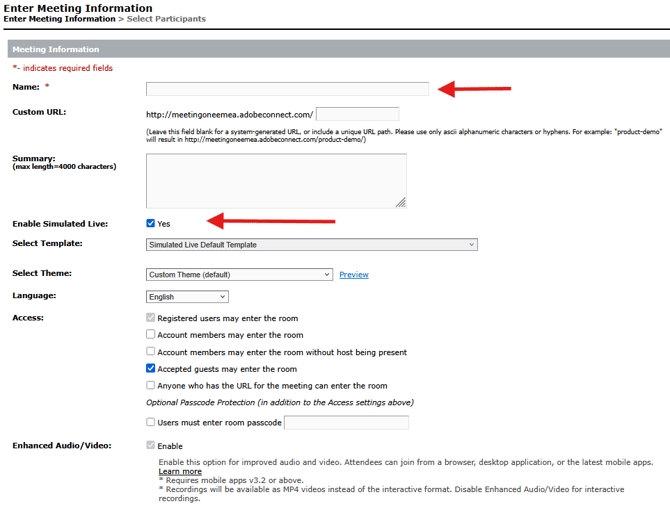
- In the Adobe Connect seminar room creation form, in addition to the usual fields (room Name, Custom URL, Select Theme, Language, etc.), check the Enable Simulated Live: _ Yes option (once the room is created, this option cannot be changed and disappears from the room editing form). As soon as this option is checked, two options become grayed out:
- Enhanced audio/video experience as Enable (a mandatory feature for the proper functioning of live simulated webinar rooms)
- Select a template (A SimuLive room uses its own Simulated Live Default Template, which cannot be modified by users).
- Click the Next button to register the Hosts, Presenters, etc., for this room, or click the Finish button to complete its creation.
Create a SimuLive Seminar Room Session
As with any seminar, you need to plan your different sessions in advance.
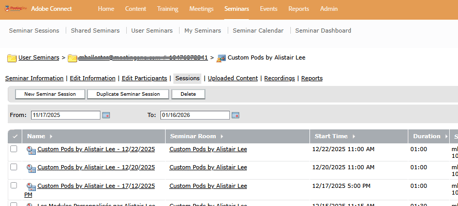
From the Seminar Information page of your SimuLive webinar room, simply click on the Sessions link, then on the New Seminar Session button, and then complete the form.
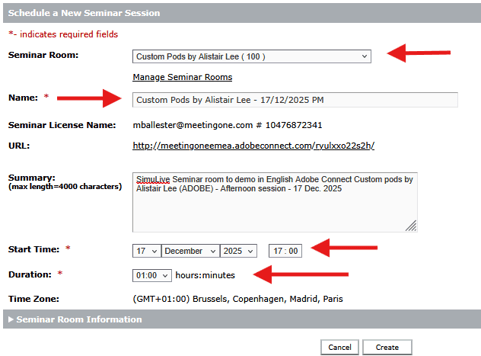
To create the next sessions, it is possible to select the session already created, then click on the Duplicate Seminar Session button, which duplicates the seminar session, simply updating the Name, Date, Time, Duration fields for each session.
If you have entered a duration longer than your prerecorded video, the session will automatically end after the time set on the Outro layout, unless you have chosen to Manually end it.
If you have entered a duration shorter than your prerecorded video, the session will automatically be extended by half an hour at the end of the duration set when the session was created.
How to design the SimuLive Webinar Room?
Open the SimuLive Webinar Room.
The first time, the room opens on the Playback layout (the second one in the layout list). Three layouts are available in the Simulated Live Default Template:
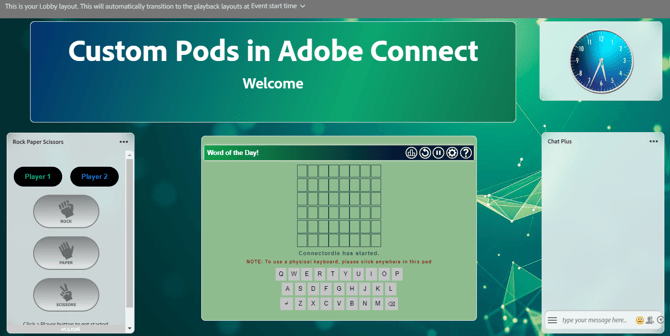
- Lobby: is a waiting room for participants; this will be the first layout your participants see upon arriving in the room before the online seminar begins.
- Playback: contains by default an Adobe SimuLive introductory video which needs to be replaced with your prerecorded video content.
- Outro: wraps up the session with final messaging, survey, resources to share, eventual next steps, etc., and this after all the prerecorded video content has been played.

To design the SimuLive webinar room, you will need to arrange the Lobby and Outro layouts as usual, then replace the Adobe introductory video of the Playback layout with your own prerecorded video which can be split into several layouts, where additional pods will possibly be inserted to generate interactivity (Chat, Q&A, Polls), without forgetting to configure the room preferences.
Room edits are allowed until 2 hrs before scheduled SimuLive session start.
Only one prerecorded video can be used. If you have multiple prerecorded videos, i.e. multiple MP4 files, you will need to use a video editing tool to merge them into a single MP4 video. Adobe Connect recordings can be downloaded and their MP4 files used, ideally if they do not contain interactions with participants (Polls, Surveys, Questionnaires, Chat Plus, Conversations, Q&A – these modules must be added later to the SimuLive room).
Set up the SimuLive Webinar Room Preferences de la salle de Webinaire SimuLive
Room Preferences remain accessible and can be modified even during a live broadcast.
To do this, open the ...More menu and click on Preferences. Compared to a standard Seminar Room, some options are no longer available. However, it is still possible to set various settings, including:
- in General: custom Room background, a reminder to record the session
- in Menu bar: use of the raise hand, reactions, and step-away notification
- in Chat: use of the chat panel, private conversations...
- in Q&A Pod: show the name of submitter and/or presenter with answered question
- in Broadcast control: its activation and synchronization with the recording.
Broadcast activation remains manual during scheduled SimuLive sessions. If you forget to click on Start broadcast, your participants will still hear the audio from the prerecorded video, BUT
- They will continue to see a dark gray banner saying "The broadcast will begin shortly. You will see the live content when the host starts the broadcast."
- The session recording will not start.
- If you pause SimuLive playback to use your microphone to comment on a poll result, for instance, participants will not hear you until the broadcast has started.
Prepare the Lobby layout
During the scheduled session, the room will automatically switch from the Lobby/Waiting Room layout to the Playback layouts at the default Event start time - Clicking on the Event Start Time link allows you to delay this transition (by a maximum of 5 minutes).
- Hide the Share pod named Lobby or, if necessary, reuse it.
- Add the pods you want for your Lobby layout.
For instance: Titler, Clock, Rock Paper Scisors, Connectordle, Chat Plus... - These are custom pods; usual pods such as Chat, Q&A, Poll... can also be used.- The custom pod Coundown Timer is not very useful in the Lobby layout because a grey or blue banner (depending on whether it is the Host or Participant screen), intrinsic to the SimuLive room, will indicate to everyone how much time is left before the session starts.
- Remember to rename pods that will be used in multiple versions to identify easily and eventually reuse them in other layouts.
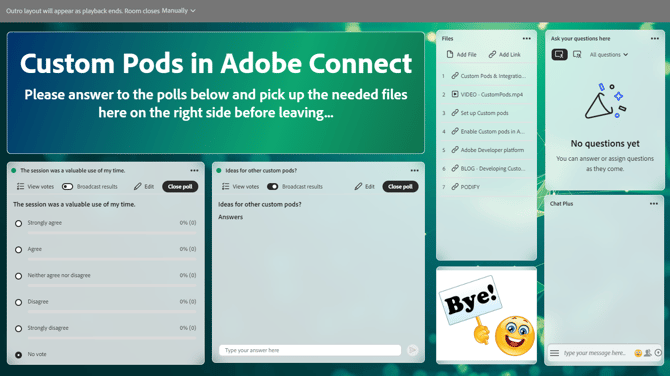
Prepare the Outro layout
This layout will appear automatically at the end of the playback of the prerecorded video (from the last split Playback layout), then the room can end either Manually or Automatically after the set time (5 minutes maximum) by clicking on the Manually link.
- Hide the Share pod named Outro or, if necessary, reuse it.
- Add the pods you want for your Lobby layout.
For instance: Titler, Poll, Chat Plus, Q&A, Resources...
Prepare the Playback layouts
This is done by splitting the prerecorded video into multiple Playback layouts.
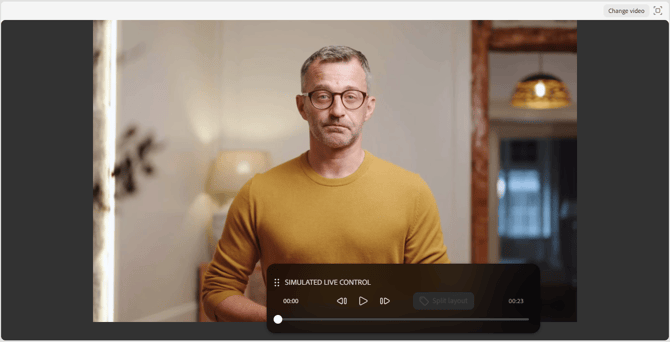
In this display (while the room is being prepared, i.e., up to 2 hours before a scheduled webinar session starts), you can see a SIMULATED LIVE CONTROL panel composed as follows:
-> at the bottom of a timeline where a large dot (cursor) indicates the video's position on that timeline, and any smaller dots indicate the start of each video segment.
-> above, 3 triangular buttons ![]() : the left one goes back to the beginning of the previous video segment, the middle one starts video playback, and the right one advances to the next segment beginning.
: the left one goes back to the beginning of the previous video segment, the middle one starts video playback, and the right one advances to the next segment beginning.
-> and a Split layout button. Each time this button is pressed, it creates a small dot on the timeline to show that the video has been segmented and duplicates the current layout. This new layout is called Playback 1, Playback 2, Playback 3, etc., and can be renamed (double-click on it to do so).
But first, you need to replace the Adobe introductory video in the Playback layout with your own prerecorded video in this untitled module.
Insert your prerecorded video into the Playback layout
- Click on the Change video button
- Drag and drop your prerecorded MP4 video file for the simulated Live webinar into the Upload Video window, or click the Browse button to upload it.
You cannot insert multiple video files; if you have several files, you will need to combine them into a single file prior the upload.
Each time you will change the prerecorded video after you have already design your SimuLive room, it will reset the Playback layouts to a single one. Only the Lobby and Outro layouts where the prerecorded video is not included won't be affected.
Prepare all your Playback layouts
-
- Resize the pod containing the prerecorded video.
- Add the desired pods into this layout.
- Play the prerecorded video to determine when to split it and switch to a new layout.
 Once the playback is paused at the right moment, or the cursor is moved to the correct duration (even if approximate), click the Split layout button. This will duplicate the current layout.
- If the prerecorded video was split approximately, it can be refined. The Playback layout thumbnail (here, Poll) shows the time at which the layout will start. By clicking on the selected layout time, you can manually change the layout's Start time (don't forget to click the Update button afterward).
- Repeat this process each time a layout needs to change, or to differentiate between two parts (for example, a presentation and a demonstration).
- Rename the newly created Playback layouts as you see fit (double-click on it to do so).
It is possible to move a layout from the Layouts panel. This allows you to easily duplicate a layout already prepared for a poll, for instance. When this duplicated layout is moved to the correct location within the Layouts panel, the times of each existing layout will readjust to maintain the same segmentation. This means that moving layouts can potentially disrupt the chronology of the different layouts (the layout won't match with the right layout time). It is therefore strongly recommended to note the times of the desired segments of the prerecorded video before moving the duplicated layouts, and ideally to update the Start time of each layout after each move.
Don't forget to open the Participants pod in the Backstage area so you can view it during the scheduled sessions, as it IS NOT possible to open the Participants pod during a SimuLive Webinar session.
Examples of Playback layouts:
- intro layout: Prerecorded video + Titler, Q&A, Chat, HouseKeeper.
- Presentation layout: large Prerecorded video + Q&A, Chat.
- Poll layout: small or hidden Prerecorded video + Titler with the poll theme, Poll, Q&A, Chat.
- Demonstration layout: large Prerecorded video + Q&A, Chat.
- Quiz layout: small or hidden Prerecorded video + Titler with the quiz theme, Quiz, Q&A, Chat.
- Survey layout: small or hidden Prerecorded video + Titler with the survey theme, Survey, Q&A, Chat.
Hide the Prerecorded video pod behind another pod if ever the host's webcam appears on it and you want to be able to pause playback during the live stream to comment on the survey results.
Be careful using Quiz and Survey, they need the host's attendance to be launched.
Chat Plus, Quiz and Survey custom pods need to be reset/cleared manually after each session. They are not taken into account when using the option Pods menu > Clear content from pods.
Simulated Live Preview
The green Preview Simulated Live button appears in the SimuLive Webinar sessions until 2 hours before the next scheduled SimuLive session starts. Then, it disappears.
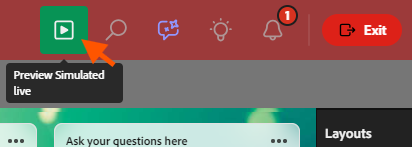
To verify that all layouts have been created and synchronized, click the Preview Simulated Live button.
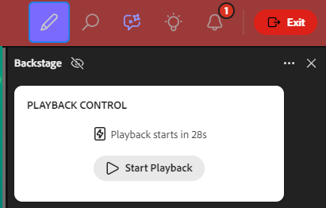
This will immediately open the backstage area with the SIMULATED LIVE CONTROL panel, which will indicate the remaining time before the automatic playback of the SimuLive preview starts (maximum 30 seconds). It is also possible to Start playback immediately by clicking that button.
Simulated Live session
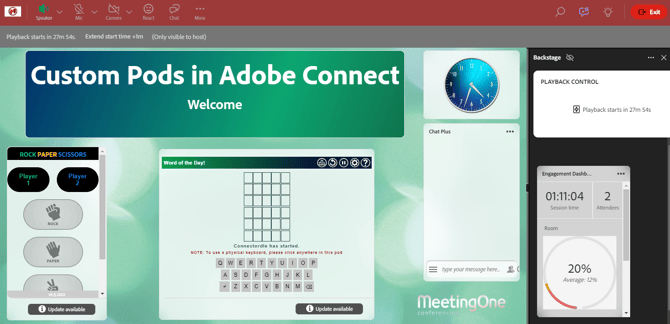
The session starts directly on the Lobby layout with the Backstage area open, and the Preview Simulated Live button has been missing for two hours prior to the scheduled session time. It is no longer possible to make any changes to the layouts. Furthermore, the Layouts panel is unreachable.
The countdown time remaining until the scheduled session start time appears in the backstage area, as well as in the gray banner, visible only to the host, from which it is possible to delay the start of the SimuLive broadcast by one minute with each click on Extend start time +1m (maximum 5 minutes).
If you were still preparing the SimuLive Webinar room more than two hours before the start of the next scheduled session, your interface will automatically switch from preparation mode to simulated live mode 30 minutes before the scheduled start time.
If your simulated live webinar session was created within two hours of its start time, and you were still logged into the room in preparation mode, your Connect interface will not automatically switch to Simulated Live mode when the session's start time finally arrives. You will then need to leave the room and rejoin it for the Simulated Live mode to appear.
If you log in after the schedule session start time, you will see that the session has already started, even without the host. The session therefore begins regardless of the host's presence. However, please note that the host is still required to manage any Polls, Surveys, and Quiz pods and to ensure everything is running smoothly.
IMPORTANT: Remember to start the recording if you want one. It will not start automatically.
On the participant side, a blue banner indicates the time remaining before the webinar begins.
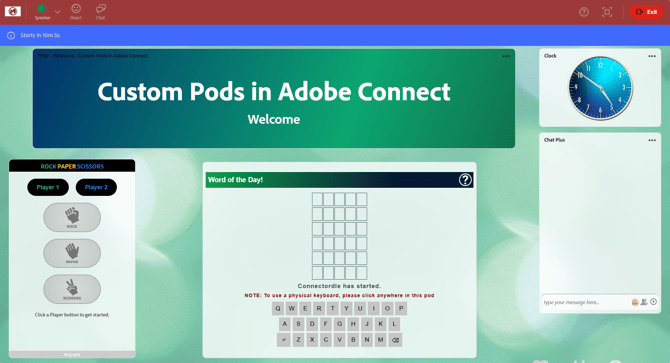
At the scheduled start time, the session automatically switches to the first Playback layout (the video starts playing automatically), then to subsequent layouts until the Outro layout.
NOTE: It is not possible to switch to another layout (previous or next) during the SimuLive live stream. The only possible option is to pause the broadcast.
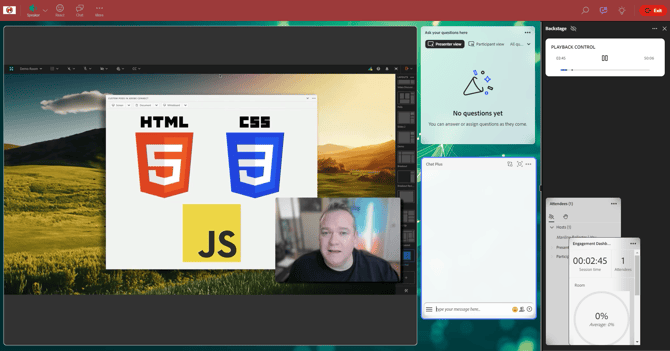
During the broadcast, you can pause playback at any time from the Backstage area (PLAYBACK CONTROL). The Microphone and Camera buttons will then appear in their usual positions in the room's button and menu banner.
You can speak in the Simulated live stream by activating your microphone so that all participants can hear you during the pause. Your microphone will mute itself when you end the pause.
Note: The Camera button is accessible when SimuLive playback is paused, but the Camera pod cannot be broadcast; it remains locked in the Backstage area.
Once all Playback layouts have been broadcast, the Outro layout will automatically appear.

The countdown of time remaining before the session closes appears in the grey banner, visible only to the host, from which it is possible to postpone the session closing by one minute with each click on Extend end time +1m (5 minutes maximum).
Remember to systematically clean the SimuLive room after each session so it can be ready for the next one (clear the chat pods (Chat, Chat Plus, Q&A, Chat Panel), and restart the Polls, Surveys, and Quizzes). The Clear content for pods option, from the Pods menu, allows you to do this very quickly during the Preparation phase (except for Chat Plus, Survey, and Quiz). During the live session, this option is no longer available; you will then have to act on each pod as soon as they appear on the layouts.
The New instant session of a SimuLive Webinar
If you have forgotten to create a session that should start immediately, it is possible at any time to start a New Instant Session from the SimuLive Seminar Room interface.
 This New instant session button appears in the Stand-by mode Notifications window informing you of the session limit of 10 attendees, as soon as you enter the seminar room when the session is not scheduled, or by clicking on the Notifications icon
 ![]() to reopen this window, if it has been closed in the meantime.
to reopen this window, if it has been closed in the meantime.
The Seminar Room preparation interface will then be replaced by the Simulated Live interface, and the live stream will start immediately on the first Playback layout, unless it was configured during the preparation phase that the SimuLive sessions start with a default delay of 1 to 5 minutes. In the latter case, everyone will remain on the Lobby layout for 1 to 5 minutes (depending on the configuration) before switching to the first Playback layout.
Some Adobe Connect links about SimuLive (source):
-
- SimuLive Overview : https://helpx.adobe.com/adobe-connect/using/webinar/overview-of-simulated-live-webinars.html
- Set up a Simulated Live webinar: https://helpx.adobe.com/adobe-connect/using/webinar/set-up-a-simulated-live-webinar.html
- Design Simulated Live webinar rooms: https://helpx.adobe.com/adobe-connect/using/webinar/design-simulated-live-webinar-rooms.html
- Simulated Live Webinars in Adobe Connect: https://www.youtube.com/watch?v=JwA55ck8RC4 - video - 12 min 30 - Alistair Lee (Adobe Connect Evangelist)